Hello (Virtual) World: Your first Daydream app
[Please note the age of this post. Google has long discontinued Daydream, and this post is very likely not relevant for you.]
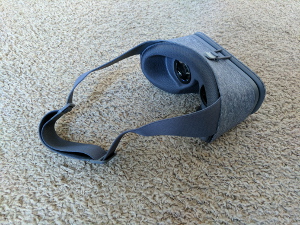
I recently bought Google's new phone, the Pixel – and alongside with it, the Daydream View virtual reality headset. I played a couple of games (there aren't a lot of Daydream apps in the Play Store yet, since it's pretty new), and it's really cool.
And then?
I felt reminded of when I got my first color monitor as a kid. My first sound card. Sure, they made the games I played much better – but I wanted more: I wanted to program them myself. Write a program that puts colored dots on the screen. Write a program that plays a sound.
And here I am, 36 years old, and I want to write a program that puts a box into virtual reality. I don't want to build a AAA game, I don't want to submit anything to the Play Store, I just want to put a box into VR! And then maybe a second box, and then maybe make a little game, I don't know. Just for fun, for myself.
It turns out that it's surprisingly hard to find out where to start when you want to build the simple Hello World of Daydream apps, without doing things like learning Unity. I just want to put a box into VR! Except that if you use the SDK without Unity or Unreal, “putting a box somewhere” looks like this. And this. Yeah no.
So somewhere between drag-and-drop in the Unity editor, and hand-writing OpenGL ES, there must be a way to write a program that puts a box into VR at the right level of abstraction for me.
Well, I did eventually find the right library to help me: JMini3d. Rajawali also looks extremely nice, but unfortunately it's too tied to the old Cardboard APIs in order to use it with Daydream.
And so with some copy & paste from JMini3d's VR demo app, the Google VR SDK sample apps, some digging through the (surprisingly sparse) documentation, and just trying things out, I finally managed to put a box into VR.
As a reference for myself, and to help anyone else out there who buys a Daydream headset and just wants to write their own Hello Virtual World, here's the step-by-step guide (I hesitate calling it a tutorial). There's probably a lot wrong with it; I don't even know what all the copied-and-pasted lines mean and if they're all necessary. If you don't care, if you just want to put a box into VR, maybe it's a good starting point for you as well.
I'm assuming a little bit of familiarity with writing Android apps using Android Studio.
Let's go!
Like almost everything, we start with File -> New -> New Project in Android Studio. Give it a name (I'm calling mine “BoxInVr”). On the “Select the form factors” screen, choose “Phone and Tablet” with a minimum API level of 24. On the next screen, choose “Empty Activity”, and on the final screen, leave “Generate Layout File” checked, but uncheck “Backwards Compatibility”. Click “Finish”, and you're ready to start.
The Manifest
First, open the AndroidManifest.xml. Add the following items to the <manifest> element, above <application>:
<uses-permission android:name="android.permission.INTERNET"/>
<uses-permission android:name="android.permission.NFC"/>
<uses-permission android:name="android.permission.VIBRATE"/>
<uses-permission android:name="android.permission.READ_EXTERNAL_STORAGE"/>
<uses-feature android:name="android.hardware.sensor.accelerometer" android:required="true"/>
<uses-feature android:name="android.hardware.sensor.gyroscope" android:required="true"/>
<uses-feature android:name="android.software.vr.mode" android:required="true"/>
<uses-feature android:name="android.hardware.vr.high_performance" android:required="true"/>
Add these attributes to the <activity> (not the <application>) element:
android:screenOrientation="landscape"
android:configChanges="keyboardHidden|screenSize"
android:enableVrMode="@string/gvr_vr_mode_component"
(Android Studio will highlight the last line in red as an error; just ignore that, it'll be fine). Finally, add this child item to the <intent-filter>:
<category android:name="com.google.intent.category.DAYDREAM"/>
Gradle Scripts
Open the build.gradle file for the module “app”.
Above the dependencies, add
repositories {
    maven { url 'https://dl.bintray.com/mobialia/maven' }
}
In the dependencies, remove the androidTestCompile and testCompile directives (are they called directives? I know nothing about gradle), and instead add
compile 'com.google.protobuf.nano:protobuf-javanano:3.0.0-alpha-7'
compile 'com.mobialia:jmini3d-core:0.9.3'
compile 'com.mobialia:jmini3d-android:0.9.3@aar'
The Google VR SDK
If you haven't yet, you need to download the Google VR SDK, which just means cloning a GitHub repo. In fact we just need very few files from it.
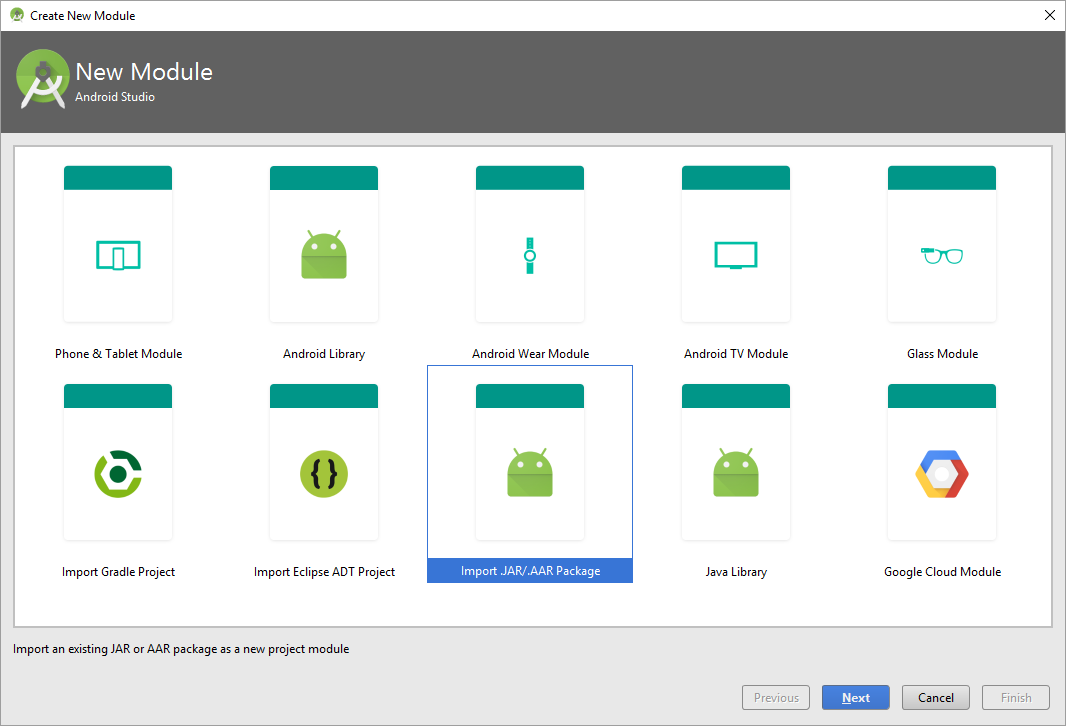
In your project, go to File -> New -> New Module. Choose “Import .JAR/.AAR Package”. On the next screen, click the “…” button to open the file chooser dialog. Navigate to your clone of the SDK, and choose the file library/base/base.aar. Now go to File -> Project Structure. In the list on the left, click the app module, then go to the “Dependencies” tab. Click the green Plus icon on the right (not the one on the top left), choose “Module dependency”, and select :base (which should be the only one in the list).
Repeat the paragraph above (i.e. adding a new module and adding a dependency) with common instead of base.
Now is a good time to run Tools -> Android -> Sync Project with Gradle Files.
The Layout
Open the autogenerated activity_main.xml file in res/layout. Open the XML view if it isn't open yet. Remove the <TextView> element, and remove the four padding attributes from the <RelativeLayout>. Add this element as a child to the <RelativeLayout>:
<com.google.vr.sdk.base.GvrView
    android:id="@+id/gvr_view"
    android:layout_width="fill_parent"
    android:layout_height="fill_parent"
    android:layout_alignParentTop="true"
    android:layout_alignParentLeft="true"/>
EyeRender
We need one little helper class that we'll copy from the JMini3d VR demo. Right-click your code folder under java, choose New -> Java Class, and enter the name VREyeRender. Add this code to the created file:
import com.google.vr.sdk.base.Eye;
import jmini3d.MatrixUtils;
import jmini3d.Renderer3d;
import jmini3d.Scene;

public class VREyeRender {

    public float[] leftProjectionMatrix = new float[16];
    public float[] leftViewMatrix = new float[16];
    public float[] rightProjectionMatrix = new float[16];
    public float[] rightViewMatrix = new float[16];

    public void render(Scene scene, Eye eye, Renderer3d renderer3d) {
        // Allow concurrence separating matices
        if (eye.getType() == Eye.Type.LEFT) {
            MatrixUtils.copyMatrix(eye.getPerspective(scene.camera.getNear(),
                    scene.camera.getFar()), leftProjectionMatrix);
            MatrixUtils.multiply(eye.getEyeView(), scene.camera.viewMatrix, leftViewMatrix);
            renderer3d.render(scene, leftProjectionMatrix, leftViewMatrix);
        } else {
            MatrixUtils.copyMatrix(eye.getPerspective(scene.camera.getNear(),
                    scene.camera.getFar()), rightProjectionMatrix);
            MatrixUtils.multiply(eye.getEyeView(), scene.camera.viewMatrix, rightViewMatrix);
            renderer3d.render(scene, rightProjectionMatrix, rightViewMatrix);
        }
    }
}
The Activity
Finally, we're getting close to putting a box in VR! Just a tiny bit of boilerplate left. Open the MainActivity. So you don't have to figure out the right imports, here's all of them that we'll use:
import android.os.Bundle;

import com.google.vr.sdk.base.AndroidCompat;
import com.google.vr.sdk.base.Eye;
import com.google.vr.sdk.base.GvrActivity;
import com.google.vr.sdk.base.GvrView;
import com.google.vr.sdk.base.HeadTransform;
import com.google.vr.sdk.base.Viewport;

import javax.microedition.khronos.egl.EGLConfig;

import jmini3d.Color4;
import jmini3d.JMini3d;
import jmini3d.Object3d;
import jmini3d.Scene;
import jmini3d.Vector3;
import jmini3d.android.Renderer3d;
import jmini3d.android.ResourceLoader;
import jmini3d.geometry.BoxGeometry;
import jmini3d.light.AmbientLight;
import jmini3d.light.PointLight;
import jmini3d.material.Material;
import jmini3d.material.PhongMaterial;
The class MainActivity was autogenerated as extends Activity, but we'll change that to
public class MainActivity extends GvrActivity implements GvrView.StereoRenderer
Android Studio will put a red line under that because we're not implementing the interface yet – just press Alt-Enter and let it implement all the methods.
We need three fields in our activity. Add these at the top:
Scene scene;
Renderer3d renderer;
VREyeRender eyeRender = new VREyeRender();
In onSurfaceCreated, add renderer.reset();.
In onSurfaceChanged, rename the parameters to width and height and add renderer.setViewPort(width, height);.
In onDrawEye, add eyeRender.render(scene, eye, renderer);
Now let's add a method with all the various things for VR initialization:
private void initializeVrStuff() {
    setContentView(R.layout.activity_main);
    JMini3d.useOpenglAxisSystem();
    GvrView gvrView = (GvrView) findViewById(R.id.gvr_view);
    gvrView.setEGLConfigChooser(8, 8, 8, 8, 16, 8);
    gvrView.setRenderer(this);
    gvrView.setTransitionViewEnabled(true);
    gvrView.setDistortionCorrectionEnabled(true);

    // This line is really important! It's what enables the low-latency
    // VR experience. Without it, you'll have a headache after five minutes.
    gvrView.setAsyncReprojectionEnabled(true);

    AndroidCompat.setSustainedPerformanceMode(this, true);
    setGvrView(gvrView);
    renderer = new Renderer3d(new ResourceLoader(this));
}
Replace the setContentView in onCreate with a call to initializeVrStuff().
Finally, let's put a box into VR!
This code, arguably the most important code, is fairly self-explanatory with JMini3d. So I'll just put the whole onCreate method here:
@Override
protected void onCreate(Bundle savedInstanceState) {
    super.onCreate(savedInstanceState);
    initializeVrStuff();

    scene = new Scene();
    scene.camera.setPosition(0, 0, 0);
    scene.camera.setTarget(0, 0, -1);
    scene.camera.setUpAxis(0, 1, 0);
    scene.camera.updateViewMatrix();

    Color4 white = new Color4(255, 255, 255);
    Color4 red = new Color4(255, 128, 128);

    AmbientLight light = new AmbientLight(white, 0.5f);
    scene.addLight(light);

    PointLight light2 = new PointLight(new Vector3(3, 0.5f, 1), white, 0.5f);
    scene.addLight(light2);

    BoxGeometry geometry = new BoxGeometry(0.5f);
    Material material = new PhongMaterial(red, white, white);
    Object3d cube = new Object3d(geometry, material);
    cube.setPosition(0, 0, -5);

    scene.addChild(cube);
}
We're creating a scene, initializing its camera. We create two lights and add then to the scene. We create a cube with a geometry (i.e. its vertices and faces) and a material, and add the cube to the scene.
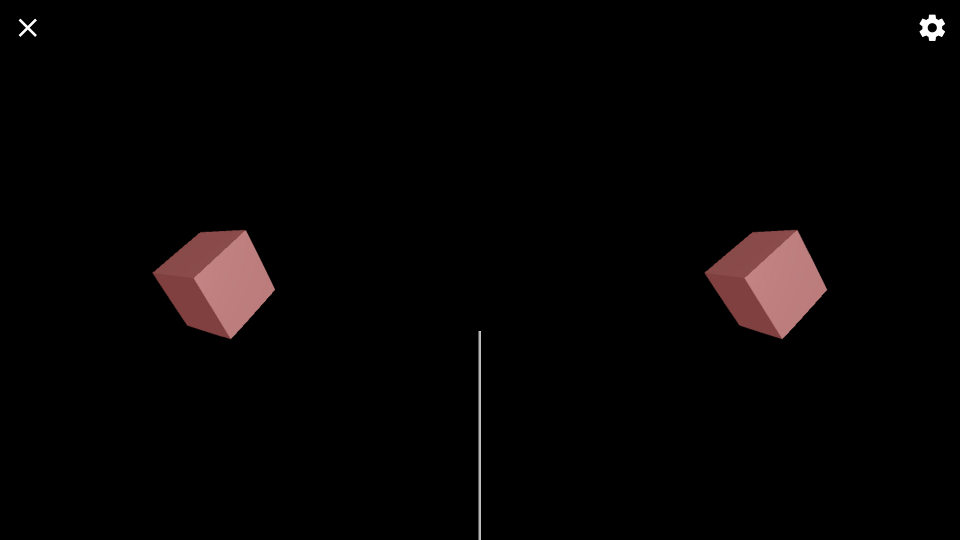
That's it! Connect your phone, and choose Run -> Run app. Put the phone in your Daydream View headset, and after the standard “Press the home button” screen, you should see your box! In VR! Amazing!

Well, actually you just see a square, because you're looking straight at the box. Let's rotate it a bit so it looks like an actual box. But instead of figuring out the right rotation matrix to put into the program, let's just rotate it by hand. Literally.
The Controller
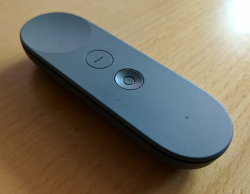
After all, Daydream isn't just about the headset, but also about the controller. Let's use it!
First off, in the same way we added the base and common modules of the SDK (scroll up to the section “The Google VR SDK”), also add the controller module now.
These are the additional imports that we'll need in the activity file:
import com.google.vr.sdk.controller.Controller;
import com.google.vr.sdk.controller.ControllerManager;
import jmini3d.MatrixUtils;
Because we'll be modifying the cube, we need to move it from a local variable to a field, and we'll also need a field for the controller.
So add these two fields:
Object3d cube;
Controller controller;
and remove the Object3d type in onCreate where we created the cube so it's no longer a local variable. Really make sure you do this. I've forgotten this multiple times while writing this tutorial :)
Now let's grab the controller object by adding this to the bottom of initializeVrStuff:
ControllerManager controllerManager = new ControllerManager(this,
    new ControllerManager.EventListener() {
        @Override public void onApiStatusChanged(int status) { }
        @Override public void onRecentered() { }
    });
controllerManager.start();
controller = controllerManager.getController();
Now we'll modify onNewFrame:
@Override
public void onNewFrame(HeadTransform headTransform) {
    // update the controller object with data from the device
    controller.update();

    // get the controller's current rotation
    float[] rot = new float[16];
    controller.orientation.toRotationMatrix(rot);

    // convert the rotation matrix into the format that JMini3d needs
    Vector3 direction = new Vector3();
    Vector3 up = new Vector3();
    Vector3 side = new Vector3();
    MatrixUtils.getRotation(rot, direction, up, side);

    // and finally, rotate the cube to match the controller
    cube.setRotationMatrix(direction, up, side);
}
And that's it already. Run the app again, put on your Daydream, and rotate your controller, and the box will rotate in sync.
In closing
Take it from here. Browse the JMini3d source (there doesn't seem to be much documentation) to find out what else there is besides boxes. Read the Controller documentation on how to get more than just the controller's rotation.
And have fun. I'm sure I will, too.
previous post: The making of StackEgg
next post: What I recently learned about color
To see comments or leave your own, . Here is their privacy policy.
You can also find me on Mastodon.